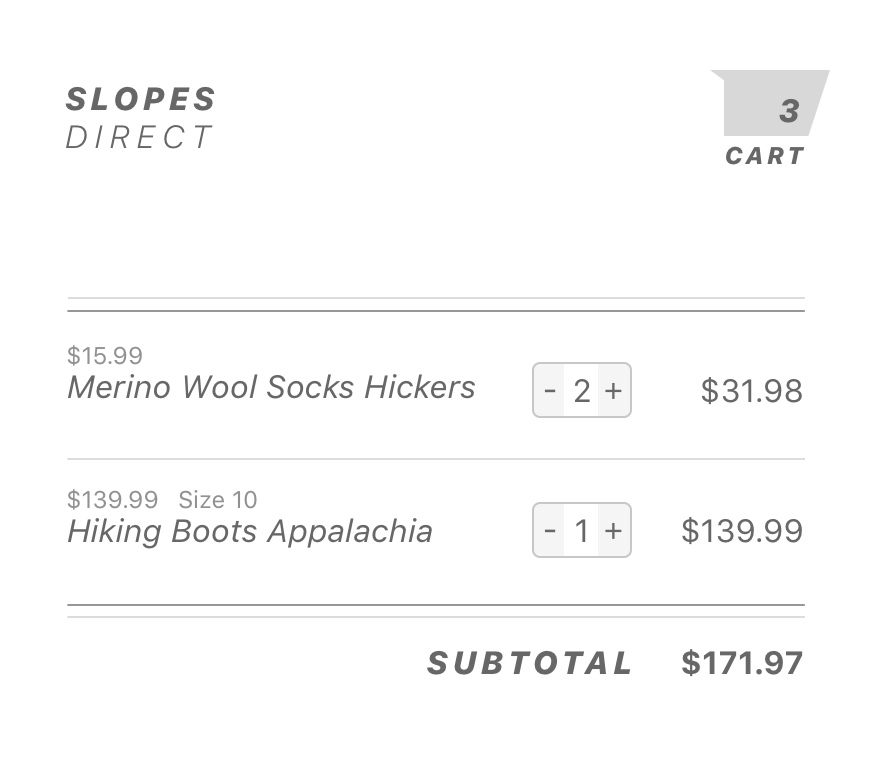
As an example, let’s take a shopping cart. Like this one:
That whole page could be managed via a Single-Page Application (SPA), but let’s see how to make this more modest. That means the HTML will be prepared server-side, and we’ll add behaviour via JavaScript.
On this page, there are two components in need of some added behaviour:
- the
cart, listing the items in the middle of the page, allowing the user to change the quantity of each item; - the
cart-quantity, in the top right, showing the overall quantity in the cart.
Modern JS allows us to define the JavaScript code for each component separately, and then combined together using a compiler like Webpack, and so that’s what we’ll do.
Approach No. 1: Sprinkles
See the demo or browse the source code
The first approach entails sprinkling some custom behaviour onto server-generated HTML.
The lightweight Sprinkles approach has two main ideas:
- Adding event listeners, preferably caught all the way up at the document level instead of on the element itself, to catch user interactions and respond with…
- Making small updates to the page’s elements – adding or removing classes, changing text in places, modifying element attributes.
Together, these two ideas combine to produce the most modest approach to add interactivity to a page.
For our cart example, all of the interactivity is centred on the quantity field. That’s the only place where user input is being caught. We’ll set up the event listener further below, but first, let’s think of what to do when the quantity field is updated by the user.
Changing the quantity will trigger these updates:
- the item’s subtotal will be updated;
- the cart’s subtotal will be updated too;
- the
cart-quantitywill also need to be updated.
The first challenge will be to update the cart-quantity.
Since the cart-quantity will be defined separately, we’ll use event listeners so we can broadcast the newQuantity and have the cart-quantity receive it.
// cart-quantity.js

const cartIconQuantitySelector = '[data-behavior="cart-icon-quantity"]'

// listen for the event
document.addEventListener('cart-quantity-updated', (event) => {
  if (!event.detail || !event.detail.newQuantity) return

  // find the cart-quantity element on the page
  const cartQuantityEl = document.querySelector(cartIconQuantitySelector)

  if (!cartQuantityEl) return

  // replace the text with newQuantity
  cartQuantityEl.textContent = event.detail.newQuantity
})
That means that within cart.js, we’ll dispatch that event when any quantity is changed.
// cart.js
function broadcastNewCartQuantity() {

  // let newQuantity = ...

  const event = new CustomEvent('cart-quantity-updated', {
    detail: {
      newQuantity,
    },
  });

  document.dispatchEvent(event)
}
The second challenge will be about setting the subtotals. For that, two issues pop up:
- We need to associate the quantity field to the subtotal field on the same line. For this, we’ll use the
data-product-idattribute on both the quantity field and the subtotal element. - We need to keep track of the price of the item. For this, we’ll use the
data-item-priceattribute on the subtotal element.
<input type="number" data-behavior="cart-item-quantity"
 data-product-id="sd001" value="1" />
<!-- ... -->
<span class="cart-item-price-subtotal" data-behavior="cart-item-subtotal"
 data-product-id="sd001"
 data-item-price="15.99" data-item-subtotal="15.99">15.99</span>
That way, when the quantity field is updated, we’ll just look on the page for the subtotal element with the same price id, and do the multiplication against the price and the quantity to update the subtotal.
For the change listener on the quantity field, let’s set it up on the whole document. That will allow us to set the event listener once, and not have to add it again if we replace the cart’s markup with an updated cart coming from the server-side.
function enableQuantityFields() {
  document.addEventListener('change', (event) => {
    // make sure the change event came from the quantity field
    if (event.target.getAttribute('data-behavior') !== 'cart-item-quantity') return
    updateItemSubtotal(event)
    broadcastNewCartQuantity()
  })
}

enableQuantityFields()
Notice too how we’re using the data-behavior attribute instead of using an html class or id to associate our JavaScript with an element on the page. That allows designers to change the classes freely without fear of affecting the behaviour. That trick comes from the folks at Basecamp. This next approach comes from the folks at Basecamp too: Stimulus.
Approach No. 2: Stimulus
See the demo or browse the source code for the Stimulus demo.
Stimulus is a small JavaScript framework allowing to automate adding behaviour to page elements as they’re added to the page. That’s handy, since that spares us from adding event listeners to the page manually. How does it do that?
Just like css automatically adds styling when an element is added to the page, stimulus watches the DOM (Document Object Model) for new elements, and wires them up with behaviour defined in Stimulus controllers.
A controller looks like this:
// cart-quantity_controller.js
import { Controller } from "stimulus"

export default class extends Controller {
  static targets = ["quantity"]

  updateQuantity(event) {
    if (!this.hasQuantityTarget) return

    if (!event.detail || !event.detail.newQuantity) return

    this.quantityTarget.textContent = event.detail.newQuantity
  }
}
That updateQuantity method handles receiving an event fired at the document. To associate that controller method with an actual event, that’s done directly in the html of the page.
<div class="col text-right"
 data-controller="cart-quantity"
 data-action="cart-quantity-updated@document->cart-quantity#updateQuantity">
  Cart: <strong data-cart-quantity-target="quantity">2</strong>
</div>
This bit of html reads like this:
- this div is controlled by the
cart-quantitycontroller - when the
actionnamedcart-quantity-updatedis dispatched on thedocument, fire thecart-quantitymethod calledupdatedQuantitywith that event data passed as a parameter. - within the
cart-quantitycontroller, the quantity element is accessible via thequantitytarget (via thequantityTargetshorthand)
The cart can also be governed by its own controller. And inside the cart, there can be multiple elements governed by a cart-item controller.
The quantity field can then be defined to have two controllers handle its change event, both the cart controller and the cart-item controller.
<div class="cart" data-controller="cart">
  <div class="cart-items">
    <!-- for each cart item ... -->
    <div data-controller="cart-item" class="cart-item">
      <!-- ... -->
      <input type="number" value=""
       data-cart-target="quantity"
       data-cart-item-target="quantity"
       data-action="change->cart#updateSubtotal change->cart-item#updateSubtotal change->cart#broadcastNewQuantity"
       data-item-price="13.99"
       />
      <!-- ... -->
      <span class="cart-item-price-subtotal"
       data-cart-item-target="subtotal">15.99</span>
    </div>
    <!-- endfor -->
  </div>
  <!-- ... -->
  Subtotal
  <!-- ... -->
  <span class="cart-subtotal-price-subtotal"
   data-cart-target="subtotal" >139.99</span>
</div>
And the cart controller would look like this:
import { Controller } from "stimulus"
import roundCurrency from "../lib/roundCurrency"

export default class extends Controller {
  static targets = ["quantity", "subtotal"]

  updateSubtotal() {
    // let subtotal = ...

    // ...
    this.subtotalTarget.textContent = roundCurrency(subtotal)
  }

  broadcastNewQuantity() {
    // ...
    document.dispatchEvent(event)
  }
}
Stimulus makes the JavaScript behaviour layer more readable and pleasant.
Both the Sprinkles example and the Stimulus example rely on the server to generate the markup. The state (the data) is stored in data attributes in the markup itself.
This last approach explores what it’s like to create the markup in the JavaScript, and have it react to changes in the values of the data.
Approach No. 3: Spot view-models
See the demo or browse the source code for the view-models demo.
View-models (like Vue and React) are made to update the DOM when changes in the data occur. While Stimulus watches for changes in the DOM to connect or disconnect controllers and their event handlers, View-models watches for changes in the model (the data) to change the view (the markup).
This can be useful when changes in the data can end up creating multiple permutations to a view.
Although our cart example doesn’t produce many permutations in the view, let’s still see how we can integrate view-models without going all-in with a Single-Page application (SPA).
To avoid the SPA approach, we’ll use view-models just in the spots of the page where we need reactivity.
- the
cartwill be managed by its own view-model - the
cart-quantitycould be managed using a plain sprinkles component like in Approach 1, but let’s manage it using a view-model too.
In this case, let’s use Vue, which is approachable enough to just use it in spots on an overall back-end driven page.
Here’s the .vue file for the cart-quantity view-model:
<template lang="html">
  <span>
    Cart: <strong>{{ quantity }}</strong>
  </span>
</template>

<script>
export default {
  data() {
    return {
      quantity: {}, // changes to the quantity will change
                    // the html automatically, according to the template
    }
  },
  mounted() {
    this.quantity = JSON.parse(this.$el.parentNode.getAttribute('data-quantity'))

    // as this view-model is initialized (mounted), we listen for updated
    // quantity events
    document.addEventListener('cart-quantity-updated', this.getNewQuantity)
  },
  beforeDestroy() {
    // because we manually added an event listener, we need to remove it
    // before we destroy the vue
    document.removeEventListener('cart-quantity-updated', this.getNewQuantity)
  },
  methods: {
    getNewQuantity(event) {
      if (!event.detail || !event.detail.newQuantity) return
      this.quantity = event.detail.newQuantity
    }
  }
}
</script>
When the Vue instance is mounted(), which is the method that’s fired when Vue takes over the element it’s tied to, the quantity is taken from a data-quantity attribute on the instance’s parentNode. With Vue, that’s an approach that saved a few kbs, because we don’t need the html parser that’s packaged with the whole Vue bundle.
<div class="col text-right"
 data-behavior="cart-quantity"
 data-quantity="2"></div>
And to mount the instance, we use this approach, again saving us from requiring the Vue html parser, saving us a few kbs.
document.addEventListener('DOMContentLoaded', () => {
  const el = document.querySelector('[data-behavior="cart-quantity"]')
  if (!el) return

  new Vue({
    // inject a new fake element that will be converted to the Vue instance on mount
    el: el.appendChild(document.createElement('cart-quantity')),
    render: h => h(CartQuantity),
  })
})
The cart.vue is more complex. It uses sub-components cart-item.vue and currency.vue to manage each cart-item and to print out a properly formatted currency. Check out the repo for all the details.
Three Ways to Be Modest
In this example, we’ve seen how a UI like this can be made using either one of these three ways to be modest:
- Sprinkles: a combination of modest DOM changes paired with globally-defined event handlers;
- Stimulus: a way to automatically add/remove event handlers to elements as they’re added to/removed from the DOM;
- Spot view-models: upgrading only some components to be reactive to data changes, when needed.
All three approaches were:
- mostly driven by server-generated HTML, saving us from having to use a Single Page Application (SPA) approach;
- split-up in different components, even when using the Sprinkles approach, since we’re using a packager;
- made to have the different components communicate their state to each other via dispatching events and event handlers (e.g. the
cart-quantitygets told to update on quantity changes); - made to use few dependencies, and be built to work for a long time.
Next, we ask the question: How can we use all three approaches in one project?